Wednesday, June 18, 2025

Module 5- Exploring and Manipulating Data


Figures 1-4: Creating a File geodatabase and copying data into it.


Flow chart denoting the cradle to grave process of creating a file geodatabase, copying data, and using cursors to retrieve and populate a data dictionary.


This week, we dove into manipulating data using Python. We learned the ease of copying data to geodatabases, creating a search cursor to extract data from said geodatabase, and then creating and populating an empty dictionary.


Steps 1-4


The first four steps for creating this script were straightforward and had no issues copying the data into the geodatabase. The issue I ran into was when I went back in to add print statements in the for loop for each feature class, I accidentally had all the print statements say “create feature class” instead of listing the desired fields. It was not an easy fix. I had to restart Arc GIS and hope for the best.


For Step 3: When using the search cursor, the delimiter function needed to be used. This is what caused the most confusion because I thought I could just use cursor = arcpy.SearchCursor(fc) the and get the results back. But then I realized I had to use the delimitedField = arcpy.AddFieldDelimiters() and this narrowed down the search to the FEATURE class.

Finally, I had to ensure to turn the population field, which was an integer, to a string in the get value field because Python cannot concatenate integers, only strings.

 Step 5

Creating the dictionary deemed to be the most difficult task of all. I could not figure out why the for loop and the chosen function to add pairs of items to a dictionary was printing out an empty dictionary. Finally, after meeting at office hours, I realized that I had to create a second search cursor for the dictionary creation and add the population plus the city names as parameters. Additionally, although dictionaries cannot be indexed, you do need to start as row [0] to start populating values in. This was a key part of the dictionary’s creation.


Friday, June 6, 2025

Module 4 - Geoprocessing


                        Results of Geoprocessing operations; Add XY, Buffer and Dissolve


In this weeks module, we finally got our hands on the creation of script ad connecting it to our Map View in Arc GIS pro. what first comes to mind when I ran model builder and wrote script for common geoprocessing operations, was "I wish I knew all of this durin Intro to GIS class!" 


A key take away form this week's lab was that there are multiple ways to get to the same results. For example, in our script, we could have assigned variables to the different parts of syntax for our geoprocessing operations and make our script more flexible instead of using file paths. 


Additionlly, we could have also created a moel in model builder for both the add XY operation and buffer and used this to export a puthon script. 

Ultimately, this versatile nature of python makes me ecited to learn different inputs that could take me to the same desired result. 

                           ___________________________________________________

For more pointer on the Add XY , buffer, and dissolve operation, please see notes below. 


Part 2 - Ad XY:


Remember to import the environment and workspace.

To make script more flexible, it’s best practice to use variables instead of the hard code in the script.

So, I assigned the hospitals shapefile to the in_features argument in the ADDXY function.

Ensure you to add (env.overwriteOutput = True) to override existing files.


Part 3 - Creating a 1000 Meter buffer and Dissolve:


Use the buffer analysis tool syntax to create a code block that performs the 1000-meter buffer. The arc GIS pro help page was a life saver when trying to resolve this as it gave a description of what was required for each parameter in the function.  It was important to remember to enter( “ ” )for optional empty parameters. Lastly, it was important to choose the correct dissolve option, ALL, to ensure all buffers were dissolved into a single feature class.


Wednesday, June 4, 2025

Module 3 - Debugging and Error Handling

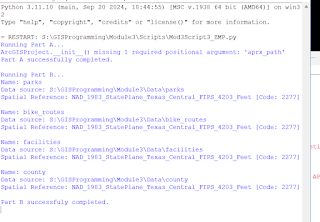
Figure 1: Results of Script 1


Figure 2: Results of Script 2


Figure 3: Results of Script 3
Figure 4: Flowchart for Script 3 - This flowchart denotes the process for creating the try-except statement in script three that allowed the full script to run regardless of existing errors. 


Module 3 introduced error handling in our scripts. Knowing about common errors and how to troubleshoot is essential to saving time while coding. A type of error, called exceptions, are errors that occur during run time and wreak havoc on your operation. A solution to these unexpected errors is using a "try except" statement that allows the script to run while exceptions are trapped and "handled". Part 3 of our assignment, denoted below, shows the process for using the try-except method for script 3. 


 Part 3: Make a code run even with errors


The try-except statement process was not nearly as tedious or as terrifying as previously imagined. When the first error occurred, a type error, I proceeded to write a try-except statement for that section. When that ran, another error came up, a name error. Then, I wrote another try except for that! After running that, another type error appeared! Yikes! Then it hit me; you can do an all-encompassing try-except statement for the whole block of code using the catch-all Exception class. The statement began right after defining aprx and right before the final print statement was processed.  

I had to recall the importance of indentation so that the try except statement recognized the complete block of code.

Once the code was run, part b ran with no issue. 


Overall, I really enjoyed this section of the class and see how useful this will become in the future. 


Module 5- Exploring and Manipulating Data

Figures 1-4: Creating a File geodatabase and copying data into it. Flow chart denoting the cradle to grave process of creating a file geodat...